Lombok 사용 이유
Spring Project를 진행하다보면, 여러 DTO 등 데이터를 다루기 위한 여러 객체를 생성하고 사용을 하게 되는데, 그럴때마다 getter 와 setter, constructor 등을 타이핑하는 것은 상당히 지루하고 귀찮은 작업이다.
이러한 귀찮음을 줄이기 위해 Lombok annotation을 사용하는 것이다. Lombok을 사용하면 Getter, Setter 등 위에서 언급한 귀찮은 작업들을 대신해주기 때문에 매우 편리하고 코드의 작성 시간 또한 줄어드는 것이다.
Lombok 설치
Intellij IDE에서 Spring Project를 생성할 때, dependency를 추가하는 단계에서 Lombok을 추가하여도 되지만 만약 실수로 추가하지 않았다면 build.gradle 파일 안에 dependency 영역에 아래의 글을 추가하면 된다.
compileOnly 'org.projectlombok:lombok'
annotationProcessor 'org.projectlombok:lombok'
만약, Spring Project의 Test에서 Lombok annotation을 사용하고 싶다면, 아래의 dependency를 추가로 작성해주어야 한다.
testCompileOnly 'org.projectlombok:lombok'
testAnnotationProcessor 'org.projectlombok:lombok'
꼭, Spring Project가 아니더라도 Lombok은 사용할 수 있다. 별도의 설치와 설정 등이 필요하니 아래의 링크를 참고하기 바란다.
💽 IntelliJ - Lombok 설치 방법 & 오류 해결
인텔리제이 Lombok 설치 방법 롬복(Lombok)은 자바 클래스에서 반복적으로 작성되는 getter, setter, toString, 생성자 코드 등의 소스들을, 어노테이션(Annotation)을 사용하여 생략할 수 있도록 컴파일 시점
inpa.tistory.com
Lombok Annotation들
@NonNull
@NonNull를 변수에 지정해주면 자동으로 해당 변수에 값이 할당될 때, null 체크를 해주어 null일 경우 NPE(NullPointerException)을 발생시킨다.
@Data
@NoArgsConstructor
public class Animal {

    @NonNull
    private String name;

    private int age;

    private String Gender;

    public static void main(String[] args) {
        Animal animal = new Animal();
        animal.setGender(null);
        animal.setName(null);   // NPE!!
    }
}
파라미터 변수에도 사용 가능하기 때문에, null이 들어오면 안 되는 변수에 해당 annotation을 달아주면 된다.
@Cleanup
@Cleanup annotation은 try-with-resource 구문과 비슷한 효과를 가지고 있다. 해당 annotation을 달고 있는 변수의 scope가 끝나서 종료되면 close를 자동으로 호출하여 준다.
public static void main(String[] args) {
    try (  // try-catch 구문이 끝나면 sc1.close();
        Scanner sc1 = new Scanner(System.in);
    ) {
        // do something
    } catch (Exception e) {
        System.out.println(e.getMessage());
    }

    // main 이 끝나면 sc2.close()
    @Cleanup Scanner sc2 = new Scanner(System.in);
}
@Setter @Getter
이름 그대로 Setter와 Getter를 생성해주는 annotation이다. class에도 달아줄 수 있고 필드 변수에도 달아줄 수 있다. @Getter는 모든 필드 변수에 대해서 getter를 생성하지만 @Setter는 non-final 필드 변수에 대해서만 setter를 생성한다.
@Getter
@Setter
public class Animal {
    private String name;

    // final은 변수 선언 때 값을 할당하거나,
    // 생성자를 통해 할당할 수 있음
    private final int age = 20;

    private String Gender;

}
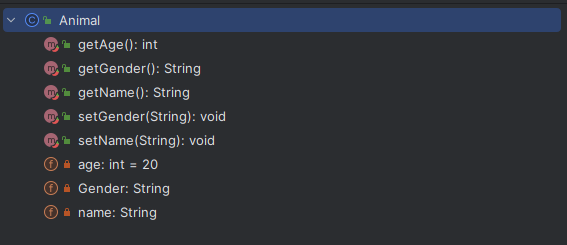
Intellij IDE의 경우 ctl + F12 단축키를 통해 해당 클래스의 메소드를 확인할 수 있다.

final 필드 변수인 age에는 Setter가 생성되지 않은 것을 확인할 수 있다. 또한 final 필드 변수에 Getter에는 lazy 속성을 통해 getter를 호출할 때 값을 설정하도록 할 수 있다.
@NoArgsConstructor
public class Animal {

    @Getter(lazy = true)
    private final int age = defaultValue();

    private int defaultValue() {
        System.out.println("defaultValue() 호출");
        return 20;
    }

    public static void main(String[] args) {
        Animal animal = new Animal();
        System.out.println("=".repeat(20));
        System.out.println(animal.getAge());
    }
}
실행시켜보면, 아래와 같은 결과가 나온다.
====================
defaultValue() 호출
20
@ToString
클래스의 toString() 메소드를 오버라이딩한다.
@AllArgsConstructor
@ToString
public class Animal {
    private String name;

    @ToString.Exclude  // 해당 필드 toString 에서 제외
    private String Gender;

    private int age ;


    public static void main(String[] args) {
       Animal animal = new Animal("lion", "mail", 20);
        System.out.println(animal);
    }
}
위의 코드를 돌리면, Gender 값은 제외된 아래의 결과가 나온다.
Animal(name=lion, age=20)
또한 @ToString이 callSuper 속성으로 상위 클래스의 toString을 호출할지 안할지에 대한 여부도 설정할 수 있다.
@ToString
class Creature {
    private String type;
}

@AllArgsConstructor
@ToString(callSuper = true)
public class Animal extends Creature{
    private String name;

    @ToString.Exclude
    private String Gender;
    private int age ;

    public static void main(String[] args) {
       Animal animal = new Animal("lion", "mail", 20);
        System.out.println(animal);
    }
}
아래와 같이 상위 클래스의 toString도 호출이 되었다.
Animal(super=Creature(type=null), name=lion, age=20)
@NoArgsConstructor @RequiredConstructor @AllArgsConstructor
생성자를 생성해주는 annotation이다. 각각의 annotation이 생성하는 생성자는 다음과 같다.
- NoArgsConstructor : 기본 생성자를 생성한다.
- RequiredConstructor : @NonNull로 지정된 필드 변수와 final 변수를 파라미터로 받는 생성자를 생성한다.
- AllArgsConstructor : 모든 필드에 대한 생성자를 생성한다.
@EqualsAndHashCode
Object의 동등성, 동일성 비교를 위한 equals, hashCode 메소드를 오버라이딩 한다. 해당 annotation 또한 callSuper 속성을 통해 상위 클래스의 필드의 equals, hashCode의 호출 여부를 설정할 수 있다.
@EqualsAndHashCode
public class Animal {
    private String name;
    private String Gender;
    private int age ;
}
Intellij IDE의 ctl + F12 단축키를 통해 해당 클래스의 메소드를 확인해보자.

@Data
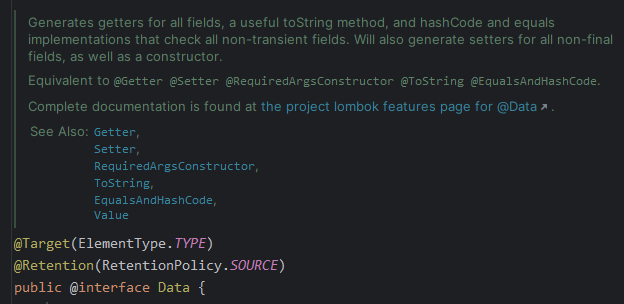
@Data annotation은 위에서 다룬 여러 annotation 들 중 유용한 몇개를 모아둔 annotation이라고 생각하면 된다. @Data의 선언부로 가보면 ( ctl 누른채로 해당 annotation 클릭!! ) 다음과 같이 annotation에 대한 설명을 볼 수 있다.

설명을 보면, @Data 는 @Getter, @Setter, @RequiredArgsConstructor, @ToString, @EqualsAndHashCode, @Value를 포함하는 것을 볼 수 있다. @Data를 통해 annotation을 더 단축시킬 수 있지만, 각 annotation의 속성은 지정해줄 수 없기 때문에 필요할 경우 해당 annotation을 별도로 달아줘서 설정해주어야 한다.
@Builder
해당 클래스에 빌드 패턴을 적용한 클래스를 생성해준다. 생성자의 선언시 생성자에 포함된 필드만 빌더에 포함된다.
@Builder
@ToString
public class Animal {
    private String name;
    private String Gender;
    private int age ;

    public static void main(String[] args) {
        Animal animal = Animal.builder()
                .name("lion")
                .Gender("male")
                .age(20)
                .build();
        System.out.println(animal);
    }
}
이를 돌려보면 다음과 같이 객체가 잘 생성된 것을 확인할 수 있다.
Animal(name=lion, Gender=male, age=20)
'Framework > Spring' 카테고리의 다른 글
| [Spring Security] 동작 구조에 대한 이해 (1) | 2024.01.30 |
|---|---|
| [Spring Boot] Cookie (0) | 2024.01.19 |
| [Spring Boot] Controller (1) | 2024.01.08 |
| [Spring Boot] 게시판 목록 페이지 (0) | 2024.01.08 |
| [Spring Boot] MVC pattern (0) | 2024.01.08 |